How to Work with Microsoft OneNote Containers

Learn how to work with your Microsoft OneNote containers. You can move, resize, merge, and hide those boxes of text and other items.
You probably don’t think much about those containers in Microsoft OneNote that hold your text, images, and other items. But these boxes are the crux of your notebook pages. They allow you to add items and move things around to your liking.
Here, we’ll explain how to move, resize, merge, and even hide those containers. This way, you can structure your OneNote pages to work better for you.
Move a OneNote Container
Moving a container to a different spot on your notebook page is super easy.
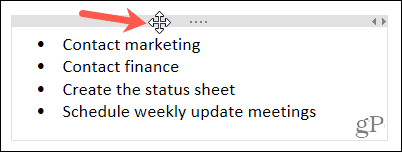
Place your cursor over the text to display the container. When you move your cursor to the top bar of the container, you’ll see a four-sided arrow called a Move Handle. Click the handle, drag the container where you want it, and release.


To move a container to a different page in your notebook, you can use the copy or cut action depending on your intent.
Place your cursor at the top of the container to display the Move Handle. Then, right-click and choose Cut or Copy. Go to the page where you want the container, right-click a spot on the page, and choose Paste.


Resize a OneNote Container
While the containers automatically resize to fit their contents, you can manually resize a container too.
Place your cursor on the top right of the container to display the two-sided arrow called a Sizing Handle. Then drag left or right to resize the container.


Merge OneNote Containers
You may end up with more containers on a notebook page than you intend or need. Rather than cutting and pasting text or other items to use a single container, you can merge them.
Place your cursor over the container item you want to merge into another. Hold your Shift key while you drag the container using the Move Handle onto the second container. You should see the container item display in the second container. Release the container handle and then release the Shift key.


Hide OneNote Containers
If you use the OneNote desktop app on Windows or Mac, you have the option to hide the containers. This doesn’t hide the contents of the containers, just the container borders.
On Windows, go to File > Options in the menu. Select Category on the left. Uncheck the box for Show note containers on pages to hide them and click OK.


On Mac, go to OneNote > Preferences in the menu bar. Select General and uncheck the box for Show Note Containers on Pages to hide them.


Once you hide the containers and move your cursor over your page, you’ll only see the text, images, and other items.
Corral Your Containers in OneNote
Structuring your OneNote pages helps you keep things organized or simply neat and clean. So remember these tips for working with your OneNote containers.
For more, check out how to add grids, lines, and color to OneNote pages or how to work with tags in OneNote.
Have tips of your own for Microsoft OneNote you’d like to share? You can hit us up with your suggestions on Twitter or Facebook.
1 Comment
Leave a Reply
Leave a Reply


Mike Brent
January 15, 2022 at 11:00 am
I have placed text lists in multiple containers on a single page. These lists get edited with additions and deletions. I used draw to place check marks beside some items in the container. When editing the container these check marks do NOT move with the lines of text. How do I achieve this?