How to Show the Ruler in Word and What You Can Do With It

You can easily show the ruler in Word and then adjust the layout of your document quickly. Set up your tabs stops and your indents.
Some applications have features that you don’t give much thought to. A perfect example is the ruler tool in Microsoft Word. This handy tool can help you do more than line things up. You can create your tab stops, set up your left and right indents, and format a hanging indent.
To get started using the ruler in Word, we’ll show you how to display it and then set up these other items for your document layout.
Display the Ruler in Word
Enabling the ruler in Word takes just a few clicks. Go to the View tab and check the box for Ruler in the Show area of the ribbon.


You’ll then see the ruler display across the top and left side of the document.
Set Up Tab Stops
On the far left of the horizontal ruler, you’ll see the tab icon which looks like the letter “L”. Each time you click that icon, it changes to a different type of tab stop. In order, you can select left, center, right, decimal, and bar tab stops.
To set one, click the icon to get to the type and then click the ruler to place it. You can select the tab stop and move it along the ruler if you want to position it differently.


To remove a tab stop, click it, and drag it downward off of the ruler.
Set Left and Right Indents
You can set up your left and right indents in Word on the Layout tab. But you can also do this easily using the ruler.
Left Indent
On the left side of the horizontal ruler, you’ll see two triangular markers atop a square. To set the left indent, drag the square. This will also move the triangular pieces which you can use later for a first line or hanging indent if you like.


Right Indent
There is only one piece on the right side of the horizontal ruler. Drag this triangular marker to set your right indent.


Set First Line and Hanging Indents
Setting first line and hanging indents are two other convenient ways to use the ruler in Word.
First Line Indent
Many types of documents like essays or books use a first line indent. This indents only the first line of each paragraph. To set the first line indent with the ruler, drag the top triangular marker on the left side of the ruler to the right.


Hanging Indent
A hanging indent is basically the opposite of a first line indent. By setting this, each line in a paragraph is indented except for the first line. To set a hanging indent with the ruler, drag the top triangular marker on the left side of the ruler to the left.


Adjust the Ruler Settings
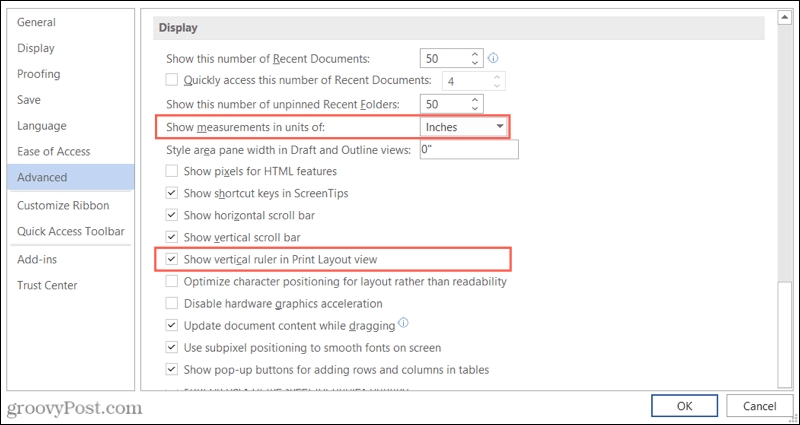
You can adjust a couple of settings for the ruler in Word if you like. You can show or hide the vertical ruler on the left and change the units of measurement for the ruler.
- To do either, click File > Options.
- Select Advanced on the left.
- Go down to the Display section on the right.
- For Show vertical ruler in Print Layout view, check the box if you want to display it.
- For Show measurements in units of, use the drop-down list to choose the unit type.
- Click OK.


Take Advantage of the Ruler in Word
If you’ve never used the ruler in Word, it may take time to get used to it appearing in your document. But after a while, you won’t even notice it’s there. And it gives you a super quick way to adjust the layout for your document.
Along with using the ruler for tab stops and indents, you can use it to resize columns if you have a Word document that benefits from that layout. Have a look at our how-to for starting and ending columns in Word for additional help.


