How to Set Up a VPN on iPhone or iPad

Setting up a VPN on your tech devices is important for your privacy and security. Here’s how to set one up on your iPhone or iPad.
A Virtual Private Network (VPN) provides secure access over the internet to private networks. VPNs are ideally suited for times when you’re away from the office or in another country and must convince your computer or another network that you’re in another location. On iPhone and iPad, Apple has made it relatively easy to set up a VPN. Here’s how to do it.
Why Use a VPN?
There are two primary reasons you should use a VPN. The first is to access an internal intranet that your company has created that’s only accessible locally. With a company-sanctioned VPN, you can access important files as if you’re in the office. In this type of situation, your IT department will give you directions to set up the VPN on each of your devices. As part of the setup, you’ll probably need to install a specific app to get the job done.
VPNs are also useful when it’s necessary to access regional services or content that’s not available at your physical location. For example, you may use a VPN to access Netflix content that isn’t available in your home country. Under this type of scenario, you would use one of the many VPN services available around the world. Any of these would also require installing an app on your iPhone, iPad, or other devices.
Which VPN Service Should I Use?
The VPN service we recommend at groovyPost is called Private Internet Access or PIA for short. Most of the team has been using the service for years and it’s both secure, fast and, most importantly, you can trust it. It also has servers spread out around the globe. If however, you’re looking for options, here’s the three I would recommend to our readers:
- Private Internet Access VPN: $2.42 per month or $2.31 per month for a two-year plan.
- NordVPN: $4.92 per month or $3.71 per month for a two-year plan.
- Surfshark: $6.49 per month or $2.21 per month for a two-year plan.
All three are quality however, they are listed in order. Private Internet Access or PIA is my top choice followed by NordVPN and Surfshark. If you’re unsure, sign up for a trial, as you can see, they are not expensive.
Security
VPNs also have the added advantage of adding new levels of security to your mobile device. For example, most VPNs offer encrypted Wi-Fi and the ability to block ads, trackers, and malware. This is perfect for free hotspots around town or when traveling abroad. Most services also allow for many simultaneous connections, unlimited bandwidth, and much more. Increasingly, many folks are now using a VPN simply to mask their real IP address. Instead, the VPN displays the IP address of the server that you’re connected to. And adding a VPN to your Wi-Fi router will help protect your IoT devices like smart speakers, smart lights, and Ring doorbells, for example.
When looking for a VPN service, you’ll need to make sure it offers servers in the country or countries important for your situation. Each of the providers above has a large footprint around the world, though some are larger than others.
Setting Up VPN on Your Apple Device
After signing up for a VPN service, the time has come to install it on your mobile device. For most folks, this will involve installing an app from the VPN provider. You can also set up a VPN manually as you’ll learn below.
Using a Provider App
In the following example, you’ll see the steps to install Surfshark on an iPhone. Keep in mind, some of these steps might differ, according to the vendor.
- Download and install the app associated with your VPN service.
- In the app, sign in to your VPN account using the username and password provided.
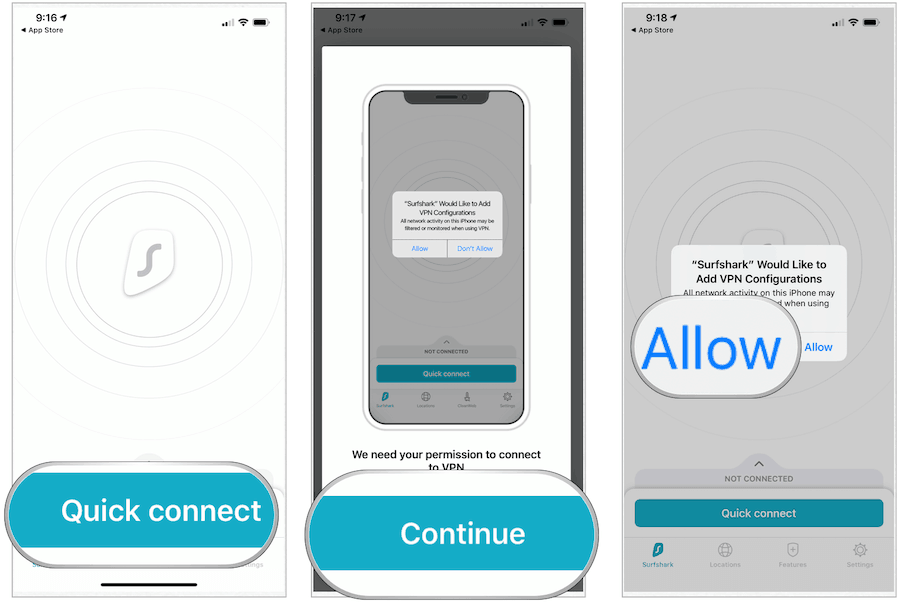
- Tap Quick Connect. In the next steps, you’ll give the provider permission to install a VPN profile on your mobile device.
- Select Connect, if applicable.
- Tap Allow on the pop-up asking for permission to add a VPN configuration.
- Enter your iPhone password.
That’s it! Your iPhone (or iPad) is now connected to the VPN. Tap Disconnect when necessary.
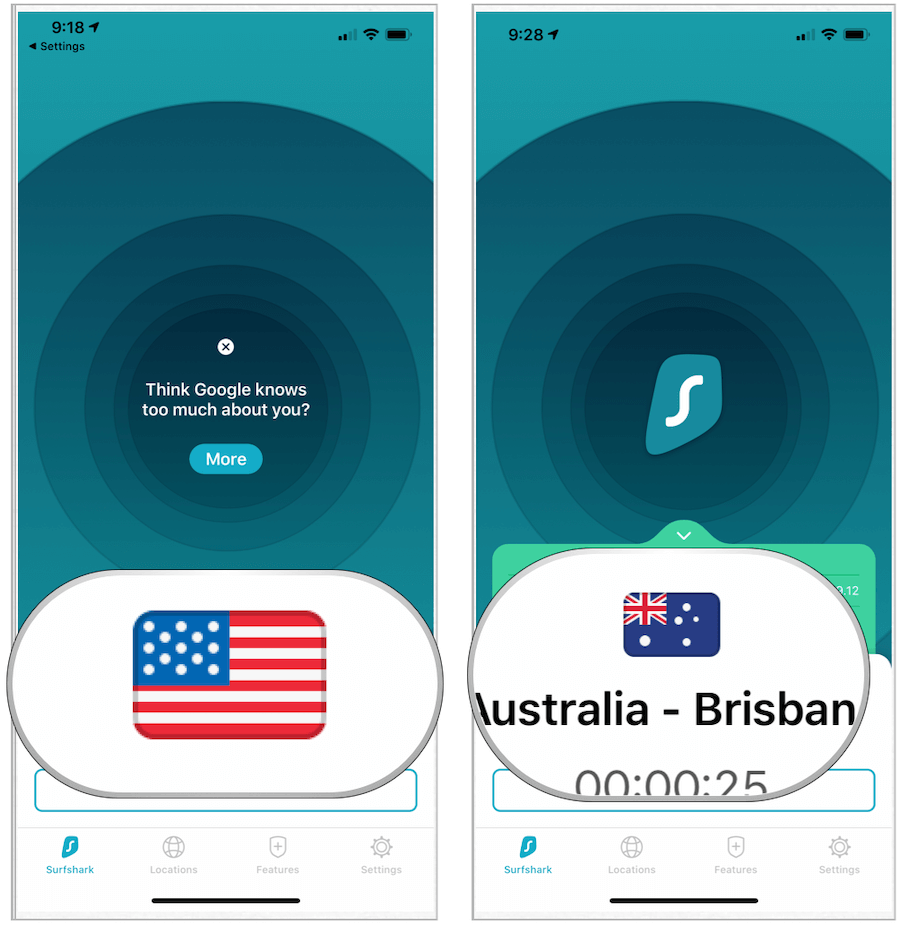
To change your device’s virtual location within the VPN app:
- Tap Locations at the bottom of the app. Typically, you can select from physical, virtual, P2P, and Multihop
- Choose the location you wish to use.
To the outside world, your mobile device now appears to be located elsewhere. In the following example, my iPhone location has skipped from the United States to Australia:
Setting Up VPN Manually
Depending on your situation, you may wish to set up a VPN connection manually. To do so on your iPhone or iPad:
- Tap on the Settings app on your device.
- Choose General.
- Select VPN.
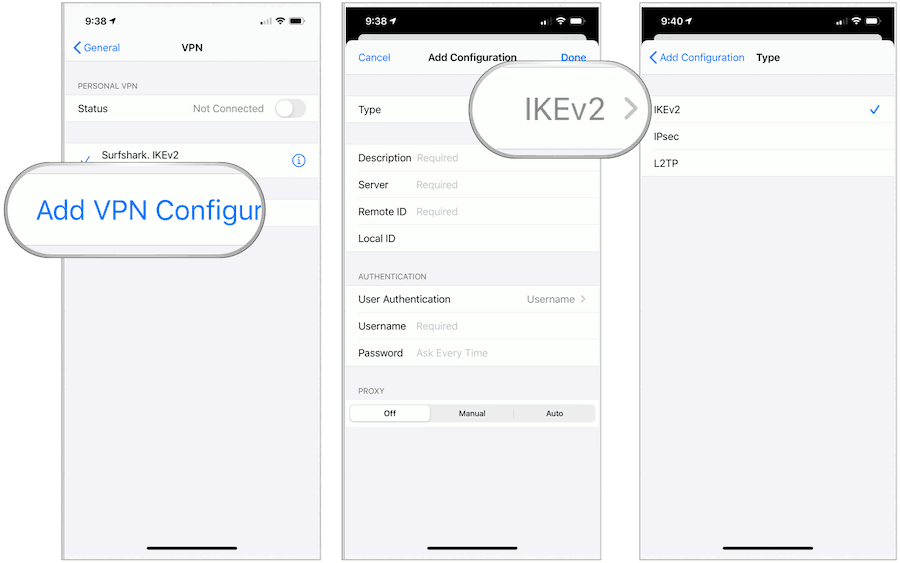
- Tap Add VPN Configuration.
- Choose Type.
- Select from IKEv2, IPSec, or L2TP.
- Tap Back at the top left.
- Next, enter your VPN settings information, which should include a description, service, and remote ID.
- Under Authentication, add your username or certificate, and password.
- If you’re using a proxy, tap Manual or Auto to enable it.
- Tap Done.
- Under Personal VPN, tap the toggle to connect.
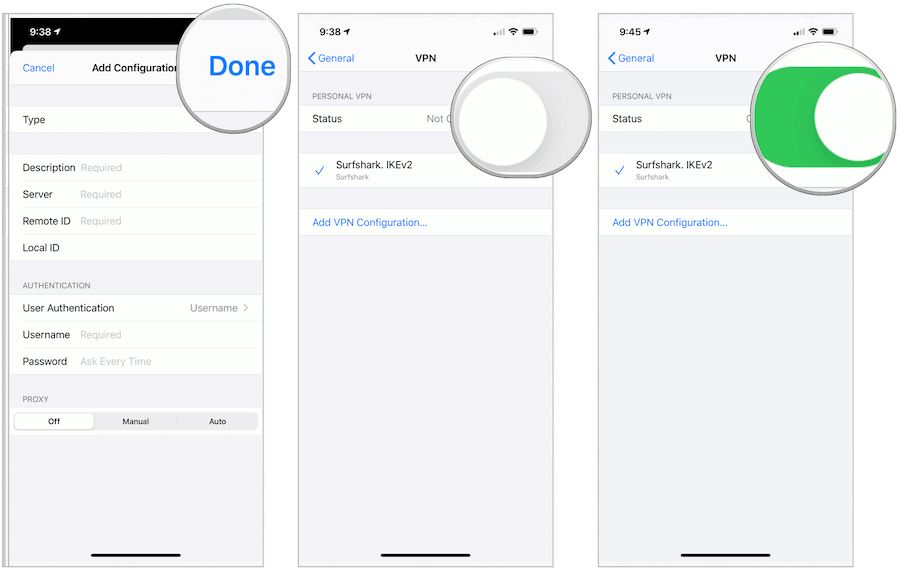
You are now connected manually to a VPN.
Summing Up
For most folks, setting up a VPN on an Apple device is as simple as installing an app and following directions. For others, it requires setting up the VPN manually. Regardless, a VPN connection allows you to access files and other content as if you’re in a different physical location. A VPN also allows you to hide your true location to others.
Using a VPN on other platforms? If your Windows 11 VPN isn’t working, you’ll need to fix the problem.