How to Prevent Windows 10 from Automatically Updating Hardware Drivers

Windows 10 will automatically update your PCs hardware drivers when Microsoft delivers a cumulative update, but you can stop them from auto-installing.
It’s important to keep Windows updated to protect against security threats, improve performance, and get new features. When Windows 10 automatically installs a cumulative update, it includes new versions of hardware drivers. But sometimes there is an issue with a driver update that makes your hardware components unstable — such as the graphics card or Wi-Fi adapter. Of course, if you get a bad one, you can rollback a driver update, but you can also stop Windows form including the driver updates in the first place.
Stop Windows 10 Pro from Automatically Updating Drivers
If you are running Windows 10 Pro, stopping driver updates is an easy process. Hit Windows key + R and type: gpedit.msc and hit Enter or click OK to open Local Group Policy Editor.

Then head to the following path:
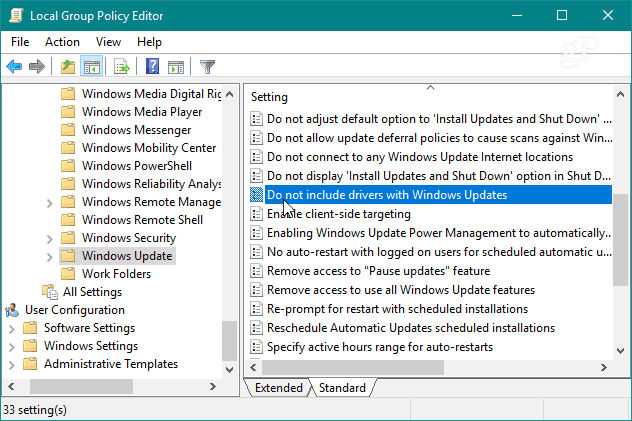
Computer Configuration/Administrative Templates/Windows Components/Windows Update
Then double-click on “Do not include drivers with Windows Update” under the Settings list on the right.
Now set the option to Enabled and click OK and close out of Group Policy Editor and restart your PC for the changes to take effect.

Stop Windows 10 Home from Automatically Updating Drivers
Unlike Windows 10 Pro, Education, and Enterprise versions, Home users don’t have access to Group Policy. You can still prevent driver updates but will need to tweak the Registry.
Open Registry Editor and head to the following path:
HKEY_LOCAL_MACHINE\SOFTWARE\Policies\Microsoft\Windows\WindowsUpdate
If you don’t have the WindowsUpdate key, you will need to create it. Then create a new DWORD (32-bit) Value and name it: ExcludeWUDriversInQualityUpdate and give it a value of 1. Close out of Registry Editor and restart your system for the change to go into effect.

Keep in mind that after making these changes, you will no longer get driver updates until you go back in and change the setting. Also, this isn’t always entirely effective. Windows Update may still deliver driver updates that are bundled with security or feature updates. So, this is aimed at a more advanced user and is something you can implement if you’re trying to avoid a known bad update.
Now, it’s worth noting that Microsoft generally does a good job with making sure the right driver updates go out with its cumulative updates considering the amount different system configurations out there. Of course, your mileage may vary. Still, just like delaying Windows feature updates, you can also stop driver updates until you are ready for them. It just takes a bit more work than checking box in the Settings app.


VP
August 10, 2019 at 2:04 am
Not working for Win 10 home
Nannymed
March 11, 2020 at 2:42 pm
Next, you ll need to create the value. With the WindowsUpdate key selected, right-click any open space in the right pane and select New DWORD (32-bit) Value.