Make Safari for Mac More Secure With These Security Tips

In Safari for Mac, Apple offers various tools to better protect you while surfing. Some of these are already turned on, while others are not.
Surfing the web always comes with risks. And yet, it’s safer than ever to visit your favorite websites. In Apple’s Safari app on Mac, various tools make things even safer. Apple turns many of these tools on by default. Here are useful security tips for Safari users.
Ways to Make Safari for Mac More Secure
Apple’s Safari has always been one of the most secure web browsers available. Recent macOS updates have added new tools and have made it easier to detect troublesome websites. The following solutions/tools are available on macOS Big Sur. Make sure you’re using the most recent macOS update on your computer.
Eliminate Those Pop-Ups
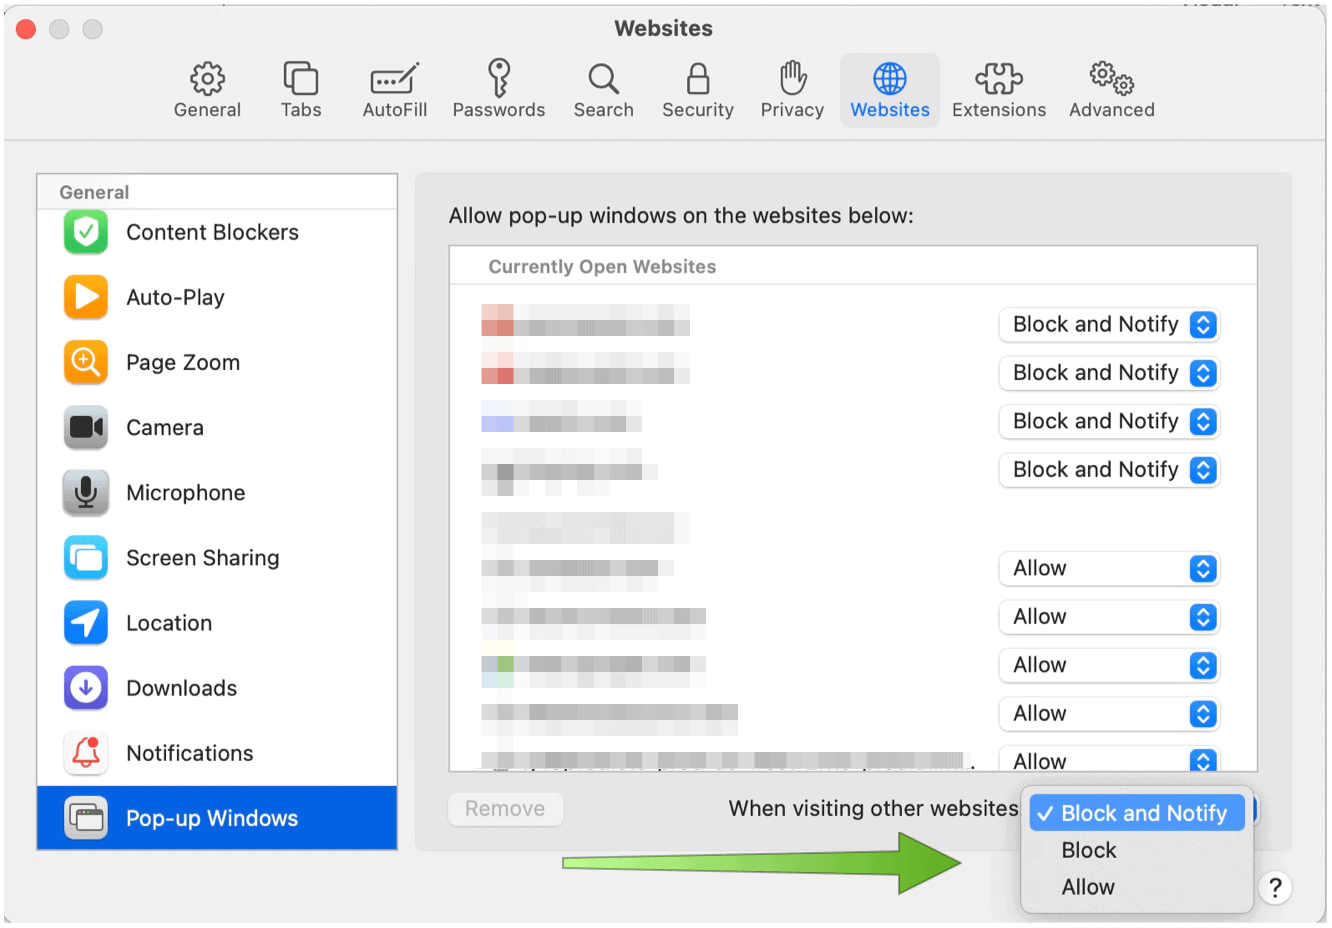
It’s 2021, and the first thing you should do to protect yourself better when web surfing is to kill those annoying pop-ups once and for all. You can do this by changing one setting through Safari:
- In Safari on Mac, click on Safari in the toolbar at the top left.
- Select Preferences.
- Choose the Websites tab.
- Click Pop-up Windows on the list on the left side of the window.
- Next to When visiting other websites, toggle to Block and Notify or Block, depending on your preference. Either way, whenever you visit a website moving forward, pop-ups will get blocked. As new sites get visited, you can unblock pop-ups as needed by select Allow next to the website name in the same location.
Take Advantage of Machine Learning
Out of the box, Safari on Mac already has an important security tool activated. With Apple’s Intelligent Tracking Prevention solution, machine learning automatically stops third-party content providers from tracking you across websites to advertise products and services. An example is when you click on a Share, Like, or Comment button on websites. These buttons can get used for tracking your web browser even without you clicking on them. Apple’s built-in tool makes sure this doesn’t happen by blocking that tracking.
To confirm Intelligent Tracking Prevention is turned on:
- In Safari on Mac, click on Safari in the toolbar at the top left.
- Select Preferences.
- Choose the Privacy tab.
- Check the box next to Prevent cross-site tracking. (This should be checked by default.)
![]()
Keep Your Searches Private
Not all web searches are created equal when it comes to security. To make your searches more secure on Safari for Mac, you follow any number of the following suggestions.
First, you can choose a privacy-focused search engine such as DuckDuckGo. Other search engines, including the world’s No. 1, Google, saves your search history. Along with this information, it also keeps the date and time of the search, some information about your computer, such as its IP address, and, if you are logged in, your account information (including your name and email address). DuckDuckGo is different. The company doesn’t store IP information, log user information, and only uses cookies when required. In other words, your search history is safe and not tied to you in any way.
Another useful tool is the macOS Big Sur privacy report. Located on your Safari start page, the new report shows you how Safari protects your browsing across every website you visit. There’s also a privacy report button on your Safari toolbar. When clicked, you can access an instant snapshot of every cross-site tracker Safari is actively blocking on any website you’re visiting. Cross-site trackers allow data collection companies to track browsing activity. Trackers can follow you across multiple websites and combine your online movements into a profile for advertisers.
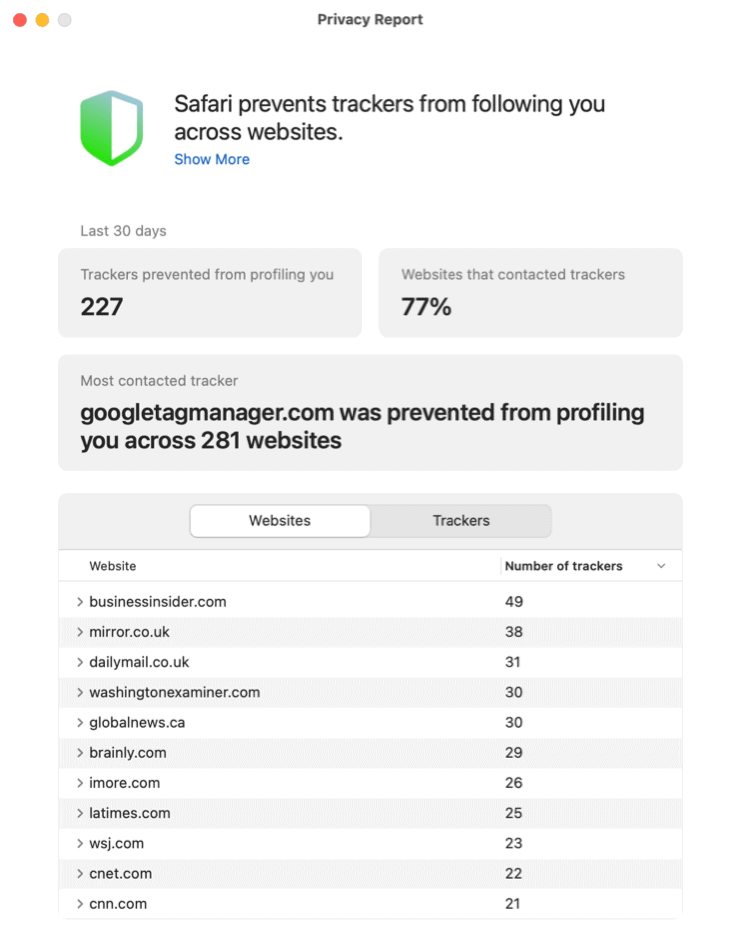
If you’re in a hurry, you can also click on the shield icon that’s to the left of the Smart Search field in Safari. The page includes a list of any trackers found on the current website.
Shut the Window
Using a private browsing window on Safari for Mac, you can take web surfing security to a heightened level. Private browsing windows don’t save details. Additionally, websites you visit aren’t shared with your other devices.
Additionally, when you’re using a private browsing window:
- Browsing initiated in one tab is isolated from browsing initiated in another tab, so websites you visit can’t track your browsing across multiple sessions.
- The system won’t save AutoFill information and website visits.
- iCloud doesn’t store open webpages.
- The results list doesn’t include your recent searches when you use the Smart Search field.
- Downloaded items don’t show up on the downloads list. (However, the items do remain on your computer.)
- If you use Handoff, Private Browsing windows are not passed to your iPhone, iPad, iPod touch, or other Mac computers.
- Not saved: Your cookies and website data.
To open a private browsing window in Safari on Mac:
- Open Safari as you always do.
- Click File on your Safari toolbar.
- Choose New Private Window.
You’ll see a gray background in the Safari search field in private browsing windows, as you can see in the example below:

Don’t Overuse Those Passwords
Those pesky usernames and passwords we need to log into websites and apps aren’t going anywhere soon. Luckily, it’s easy to save this information that doesn’t require placing sticky notes on your computer monitor or subscribing to a third-party service. Safari’s built-in password feature automatically saves usernames and passwords whenever you use them for the first time on a website. The next time you visit the site and need this information, the login information will be ready for you. Better still, if you use iCloud, your login information is available across your Apple devices.
Apple alerts you when your logins get compromised. You’ll also know when you’re reusing passwords on other sites, which increases the possibility your information could become compromised.
To find your password information:
- In Safari on Mac, click on Safari in the toolbar at the top left.
- Select Preferences.
- Choose the Passwords tab.
- Log in with your computer username and password.
Apple blocks website username and password information on this screen unless you click on the specific information.

An Advanced Tool: Block All Cookies
HTTP cookies are a necessary evil that makes browsing much easier and personal. These small pieces of data perform various functions, including website authentication and the ability of websites to remember your previous visits. Unfortunately, spammers like to use rogue cookies to spread viruses, malware, and other dangerous code.
Apple does a great job of identifying threats and eliminating them through software updates. No computer offers 100% protection, however.
Depending on your situation, you may want to block all cookies on websites. This doesn’t come recommended.
To do this:
- In Safari on Mac, click on Safari in the toolbar at the top left.
- Select Preferences.
- Choose Privacy.
- Toggle on the box next to Block All Cookies.
- In the warning box, choose Block.
Keep in mind, when you block all cookies, certain websites will no longer put out the welcome mate, which could prove frustrating after a while.

A better solution might be to delete cookies for specific websites only. Accordingly, to delete cookies but still, accept them going forward:
- In Safari on Mac, click on Safari in the toolbar at the top left.
- Select Preferences.
- Choose Privacy.
- Select the Manage Website Data… button.
- Highlight the website(s) you wish to remove cookies from the list.
- Click Remove.

As you can see, Safari for Mac features lots of features that make web-surfing secure. Apple has some of these turned on automatically, while others require your input. Use the ones that are best for your situation and happy surfing!


