How to Make a Picture Transparent in PowerPoint

Making an image transparent in Photoshop can be a good way to put greater focus on other elements. Here’s how.
Microsoft PowerPoint has all the features you’d need to build presentations without needing to rely on external software. If you’re adding content like images to your slides, you don’t need to rely on a third-party app like Photoshop to make tweaks or changes.
One of the most common changes that users look to make to images is to make it transparent. This helps push an image into the background, allow your words and other content take greater focus. If you want to know how to make a picture transparent in PowerPoint, here’s what you’ll need to do.
Making an Image Transparent Using Shapes
Unless you have a Microsoft 365 subscription, you can only make an image transparent in PowerPoint by inserting it into an empty shape, then changing the transparency level of the shape itself. Start by opening a new or existing PowerPoint presentation.
You’ll then need to create a new shape. To do this, press Insert > Shapes and select an appropriate shape (such as a rectangle) to draw.

Once selected, draw the shape onto a slide in your presentation. Right-click the shape, then press the Format Shape option.
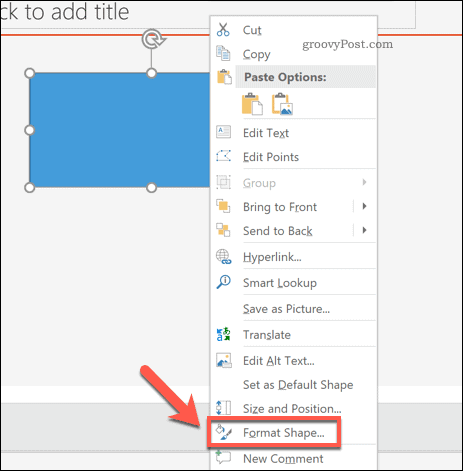
This will open the Format Shape menu on the right-hand side. To insert an image into the shape, press the Fill option.
From the options listed, press Picture or texture fill, then press the Insert button to insert the image.

Once your image is inserted, move the Transparency slider to increase the applied transparency of the shape. Alternatively, type a percentage in the box next to the slider.

Any changes to the transparency levels will appear immediately.

For instance, setting a transparency level of 50% will mean the shape (filled with the inserted image) will be 50% less clear than previously.
Using the PowerPoint Transparency Tool (Microsoft 365 Only)
The method above will work for all PowerPoint users. If you’re a Microsoft 365 subscriber, however, you’ll be able to access a new PowerPoint feature called the Transparency tool.
This allows PowerPoint users to change the transparency of images directly, and is available for PowerPoint users with a Microsoft 365 subscription on Windows and macOS.
To do this, open a PowerPoint presentation and select an inserted image. From the ribbon bar, press Picture Tools Format > Transparency.

A carousel will appear with various transparency options from 0% to 100%, allowing you to view how your image will be affected.

Select one of the available options to immediately alter the transparency of your image. Alternatively, press Picture Transparency Options below it to set a custom transparency level instead.
Making Further Changes to a PowerPoint Presentation
Once you know how to make a picture transparent in PowerPoint, you can begin to put your design skills to appropriate use. You could add a GIF to your presentation, offering video-style content without increasing the file size. If a GIF isn’t enough, there are plenty of ways you can add video to a PowerPoint presentation, including straight from YouTube.
If you need to add additional content to images, then you may want to add captions to image in PowerPoint to explain things further. However, don’t forget that you can compress images in PowerPoint to reduce the overall file size if your presentation does get too big to handle.


