How to Get Started with Zoom

Zoom is a useful tool for anyone who wants to connect to others remotely. Here’s how to get started.
During this year’s pandemic, the freemium Zoom service has become the go-to way for families and friends to communicate remotely. Launched nearly 10 years ago, Zoom had already seen its popularity grow significantly in recent years. However, this growth came mainly through the business community, which is Zoom’s target audience. Since the novel coronavirus took hold, Zoom use has exploded. School teachers, grandmas, and everyone’s best friend have been the ones using the service the most.
What is Zoom?
San Jose, California-based Zoom, is a communications platform that features tools for video and voice meetings. Unlike many of the alternatives on the market, Zoom is available across multiple platforms, including through the web and apps. Each Zoom meeting typically has a host and various invitees. Zoom offers premium packages, including those for small teams, small and medium-sized businesses, and enterprise. There’s also a freebie package that allows anyone to use it.
Zoom’s basic personal package allows a host to invite up to 100 people to a session. The maximum time allowed for these meetings is 40 minutes, although Zoom has relaxed this limitation for many during the pandemic. The free basic package allows for unlimited sessions, although you can only hold one meeting at a time.
Getting Started With Zoom
You don’t need a Zoom account to join a meeting, although you do need an account to host one. The easiest way to create an account is through the Zoom Cloud Meetings app for iOS/iPadOS or Android. You can also create an account through the Zoom website.
Create a New Zoom Account
To create an account through the Zoom app:
- Choose the Zoom Cloud Meetings app on your mobile device.
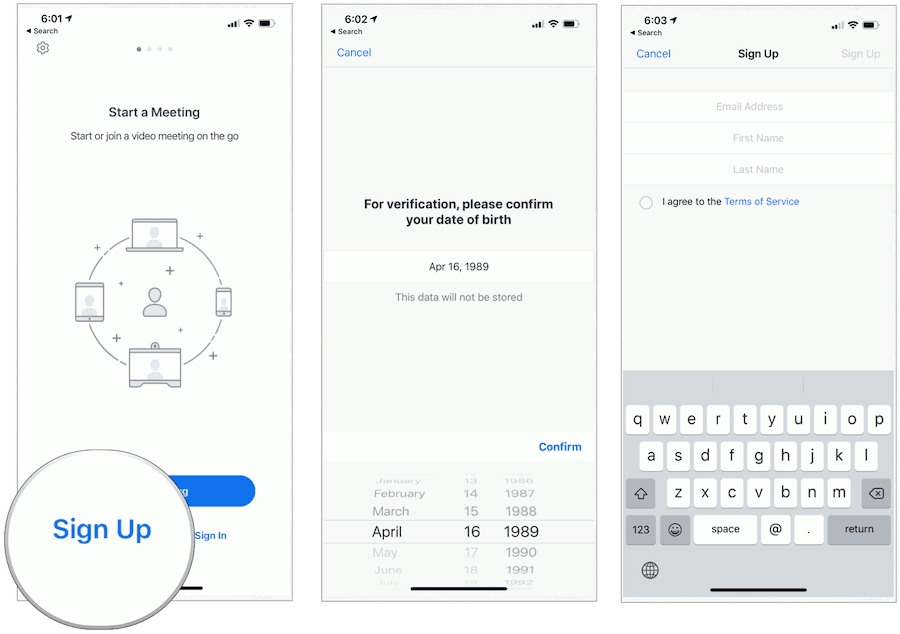
- Tap Sign Up on the main Zoom tab.
- Confirm your birthdate. This data isn’t stored.
- Add your email address, first and last name, and agree to the terms of the service.
- Tap OK in the popup box.
- Check your email for a confirmation from Zoom.
- Tap the link in the email to activate your account.
- Add a password.
At this point in the process, you can invite people to attend a meeting immediately or finish setting up your account using the prompts. Regardless, you can now host Zoom meetings!
Starting a Zoom Meeting
Once logging into your new Zoom account, you can start a meeting by following these directions:
On your mobile device:
- Choose the Zoom app on your mobile device.
- Select Meet & Chat at the bottom of the app.
- Tap New Meeting.
- Choose to Start a Meeting.
- Tap Call using Internet Audio.
- Choose Participants.
- Next, select Invite.
- Add participants. You can add by email, message, invite or copy URL. You can add up to 100 people per session.
- Tap Unmute to unmute.
- Chose Start Video to allow the participants to see your face.
- When done, tap End.

On the web:
Once you’re logged into the Zoom website, you can start a meeting using steps similar to those above.
Joining a Zoom Meeting
When invited to a Zoom meeting, you can enter following these steps:
Through the Zoom app:
- Install the Zoom Cloud Meetings app if you haven’t yet done so.
- Tap on the app.
- Select Join a Meeting.
- Enter the Message-ID you received from the host.
- Add your name.
- Tap Join to join the meeting.

By default, your device’s audio and video are turned on. You can turn either off before and during the presentation using the prompts.
On the Zoom website:
- Visit the Zoom join page online.
- Enter the Meeting ID or Personal Link Name under Join a Meeting.
- Click Join.
- Follow additional steps as needed.
Other Notes to Consider
Some important notes are worth considering both as a Zoom host and participant, including the following.
Zoom Host
- Through Zoom, you can schedule meetings in the future. Zoom offers various methods to schedule a meeting. Besides using the Zoom app, you can also schedule a meeting through a desktop client, web portal, or by using one of Zoom’s many plugins, which are available for different calendar programs.
- As a security measure, Zoom recently added a waiting room feature. This tool allows you to control when a participant joins the meeting. Like in real life, participants can’t go into the room until permitted to do so.
- A host can use a Personal Meeting ID or Message-ID for participants to access. The former is a number that’s tied directly to the host. It’s ideally suited for individuals who have regular meetings with the same participants. A Meeting-ID, by contrast, has one use. Once your session is over, the number is no longer usable. Ideally, Message-IDs should be used when scheduling multiple meetings. By assigning a separate number for each meeting, you can better manage the list of participants and meeting settings.
- As a host, you can decide whether to assign a password for meetings. By doing so, you add another layer of security.
Zoom Participant
- Before joining a meeting, make sure your device’s microphone is operational. Headphones are also useful during sessions; set these up before the session begins.
- Take advantage of the ability to mute your voice and turning off your video during a Zoom meeting. Do so for added privacy.
Summary
Zoom is a useful tool for anyone who wants to connect to others remotely. Though initially created for business use, individuals are also growing to love the service. Use it to connect to your friends, family, and other loved ones, and enjoy it!


