How to Create Personalized Mass Emails Using Mail Merge for Gmail

Mail Merge is not built-in to Gmail, but there is a way around that. Learn how to send the same email to multiple people and customize each email.
Do you have to send the same email to many people with personalized content for each one? Maybe you want to greet each recipient with their name, use their mailing address, or include their membership number.
Mail merge is a feature that allows you to create multiple copies of letters and emails to send to your contacts. Each letter or email can include both standard and custom personalized content. The information you use to customize each letter or email is taken from your data source like a contacts list.
If you use Gmail as your main email client, there is no built-in mail merge feature. However, there is a mail merge add-on available for Google Sheets that links with your Gmail account. We’ll show you how to use the Mail Merge for Gmail with Attachments add-on to personalize a batch of the same emails and send them.
Install the Mail Merge for Gmail with Attachments Add-on
Before installing and using the Mail Merge add-on, log into the Gmail account you want to use.
Then, install the Mail Merge add-on for Google Sheets.

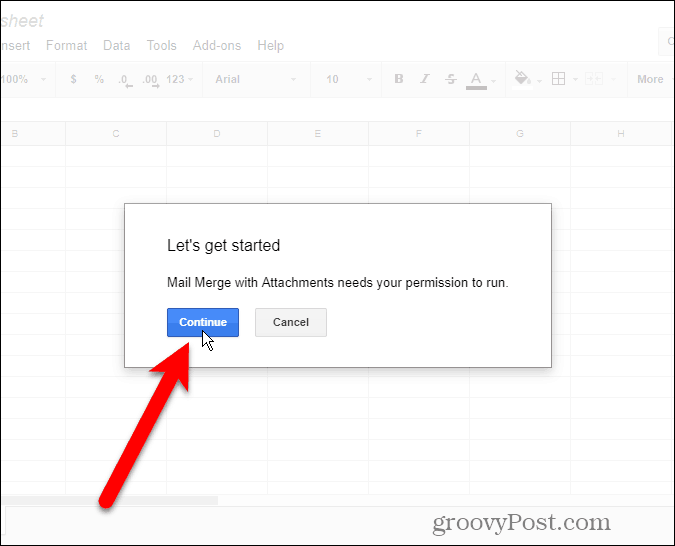
Click Continue on the Let’s get started dialog box to give the Mail Merge add-on permission to run.
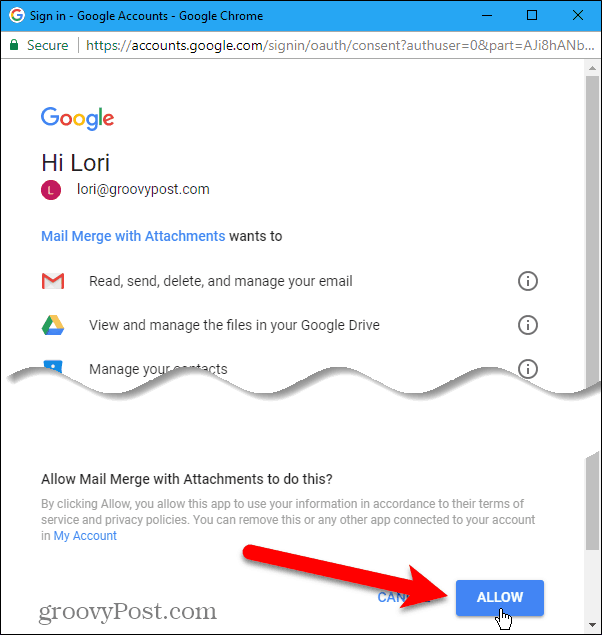
The various permissions required by the add-on are listed. Click Allow to give the Mail Merge add-on permission to access your Gmail account.
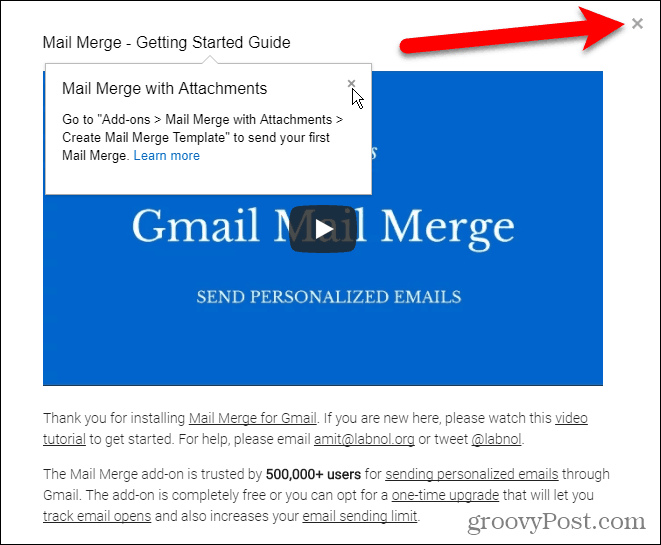
The Mail Merge – Getting Started Guide displays. Click the X to close the dialog box.
Create the Merge Template
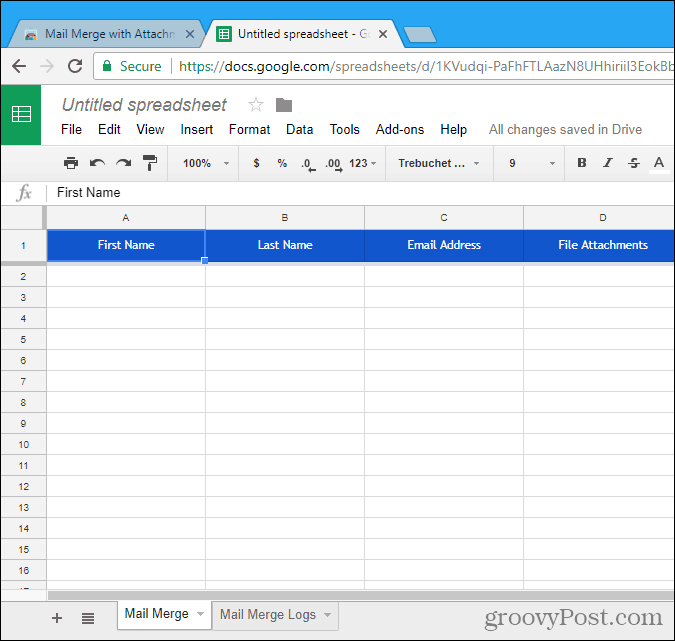
The Mail Merge add-on opens a new Untitled spreadsheet in Google Sheets on a new tab.
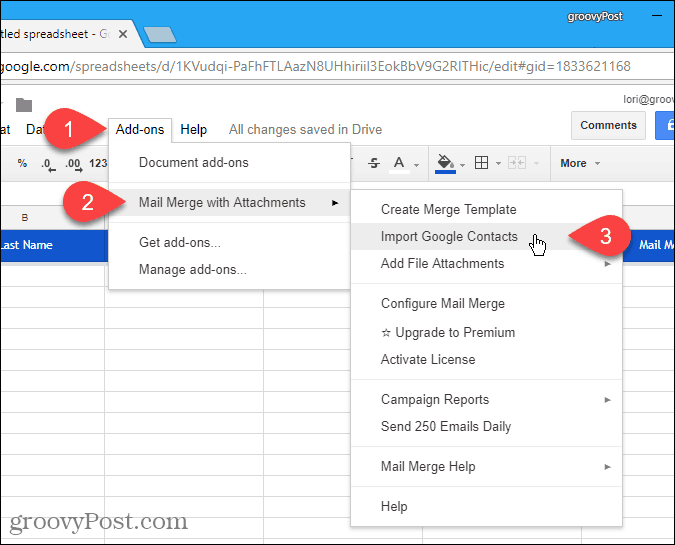
Go to Add-ons > Mail Merge with Attachments > Create Merge Template.

A blank mail merge template is created in the Untitled spreadsheet, containing the mandatory columns, like First Name, Last Name, and Email Address.
Import or Enter Your Contacts
Now, you need to add the contacts you want to use to this spreadsheet. To do that, go to Add-ons > Mail Merge with Attachments > Import Google Contacts.
Importing your contacts is the quickest way to add them. But you can also manually enter the information for the recipients into the spreadsheet.
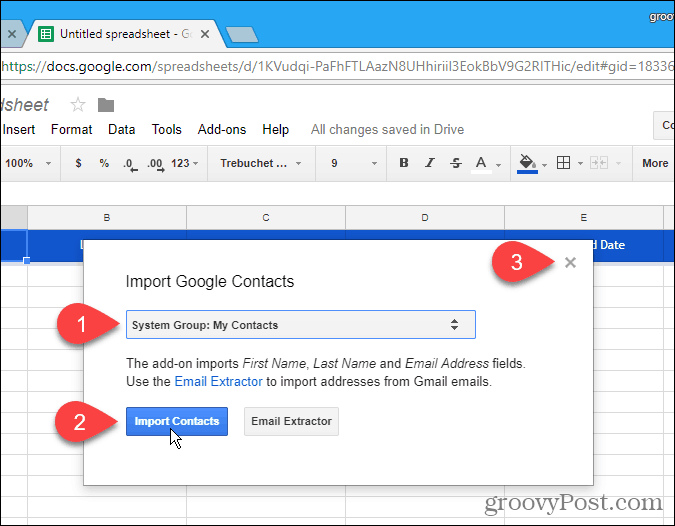
If you have certain groups of recipients you send batch emails to; you might want to create groups in your Google Contacts.
Select the group containing the email addresses you want to use from the drop-down list and click Import Contacts. The dialog box doesn’t close automatically, so click the X in the upper-right corner of the dialog box.
Add an Attachment for a Contact
One of the items you can customize in each email is the attachment. You can attach a different file to each email using a link to the file in your Google Drive account.
To do this, open a new tab and log in to Google Drive. Then, upload the file you want to attach to the email. You can drag the file onto the browser window to upload it.
Next, right-click on the uploaded file and click Get shareable link.

On the popup dialog box, make sure the Link sharing on slider is on (green).
If link sharing is already on, the URL is automatically copied when you select Get shareable link. If you did not see a message saying the link was copied to the clipboard, select the URL on the dialog box and copy it.

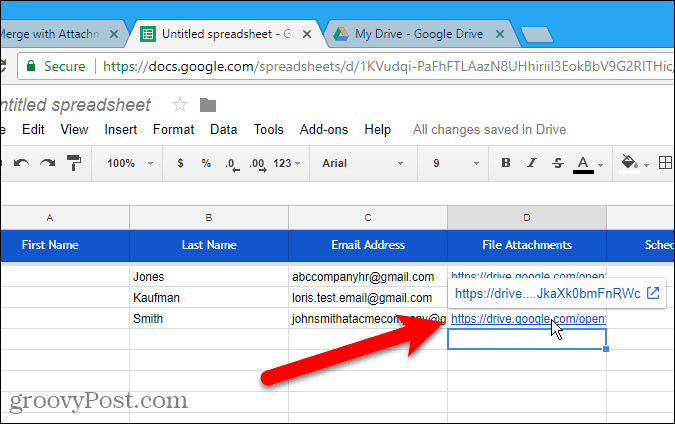
Go back to the Mail Merge spreadsheet and paste the URL into the File Attachments column for the person you want to send this file to. You can send a different file to each contact in your list.
You can also include multiples file attachment URLs, separated by commas.
Schedule the Date and Time to Send the Email
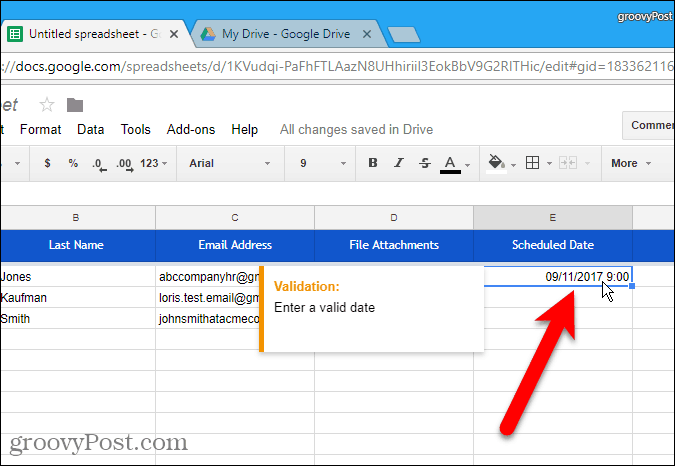
The Scheduled Data column allows you to specify a date and time to send the email, which could be different for each person.
To schedule an email, enter the desired date and time, using the dd/mm/yyy hh:mm format, in the Scheduled Date column for the desired contact.
Leave the cells in the Scheduled Date column blank to send the emails immediately once they’re set up.
Add Custom Content
Besides the standard fields included in the mail merge template, you can add other custom fields. Maybe you want to add information like each recipient’s email address and membership number. You can add columns to the spreadsheet to store that information.
For our example, we’re going to add something simple. We want to use the recipient’s last name in each email, preceded by their title (Mr., Ms., or Mrs.). So, we’re going to add a Title column.
To add a column to the mail merge spreadsheet, move your mouse over the column heading of the last populated column. Click the down arrow button that appears and then click Insert 1 right.
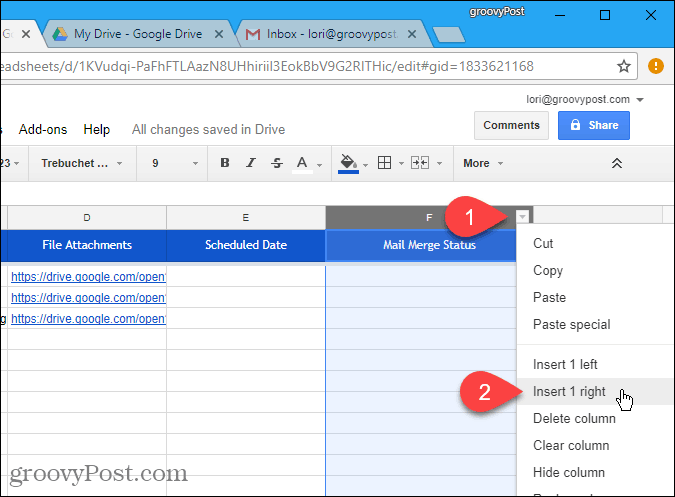
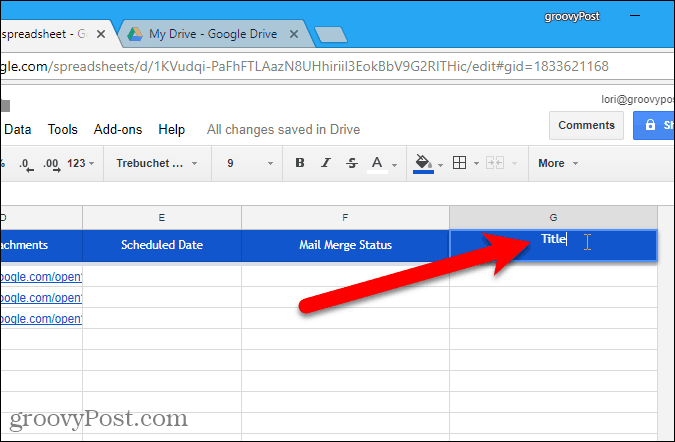
Click in the blue header cell and change the name of the column to an appropriate name. You’ll be using this name in your email draft in Gmail to insert the value into each email later.
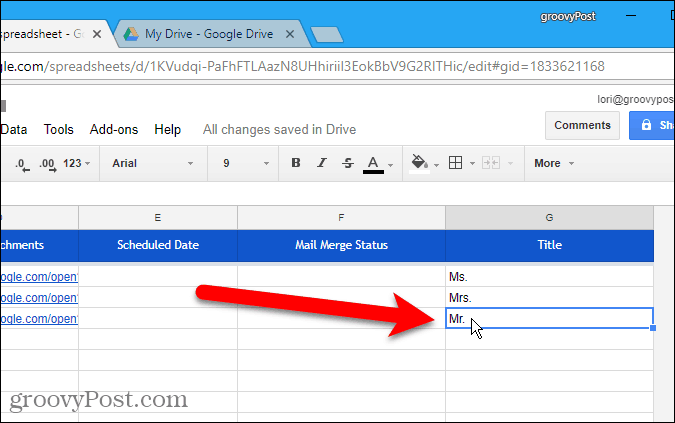
Then, enter the appropriate value for each contact in the cells below the column name.
Create the Email Draft in Gmail
Now, it’s time to create the email draft you want to send to your mail merge spreadsheet contacts and use variable fields to customize each email.
Open a new tab and log in to the same Gmail address you used for the mail merge spreadsheet. Create a new email and type the subject and body of the email message. You can also add rich text formatting and inline images to your email draft.
To include variable fields in the email, like Title and Last Name, insert the field names using the {{field name}} notation. For example, we added {{Title}} {{Last Name}} to our email. You can also add variable fields to the subject line. If you’ve added file attachment URLs to the mail merge spreadsheet, you don’t need to add that variable field to the email. They will be automatically included in the emails.
DO NOT click Send.

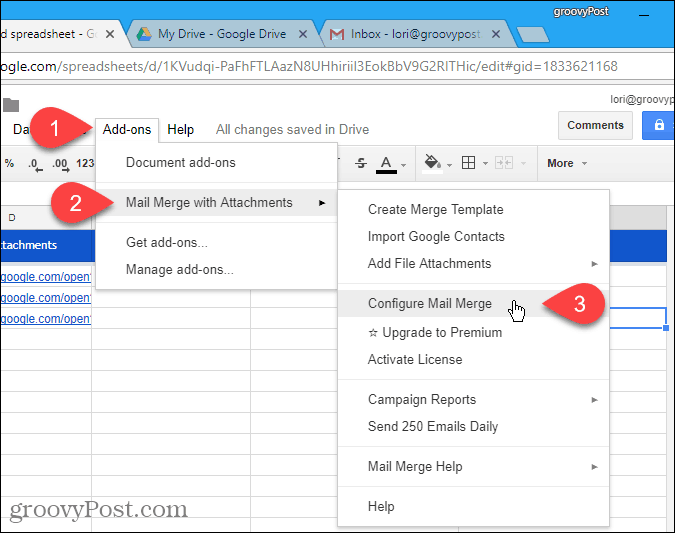
Configure the Mail Merge
Return to the mail merge spreadsheet and go to Add-ons > Mail Merge with Attachments > Configure Mail Merge.
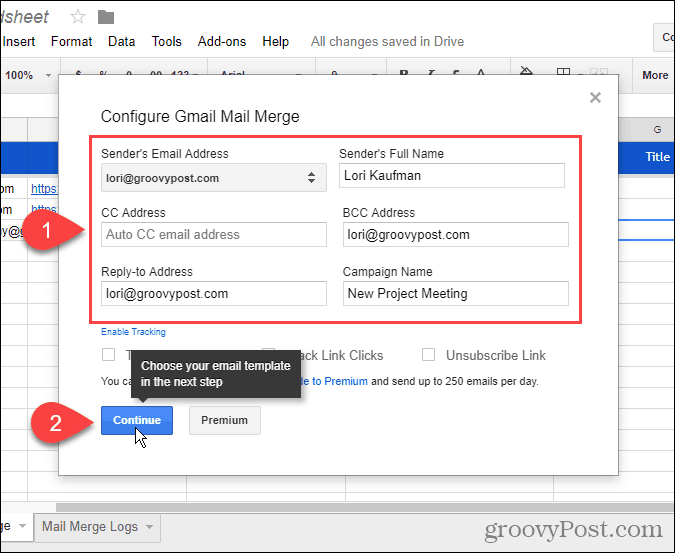
Enter the information for the email message, like Sender’s Full Name, CC Address, and BCC Address. If the Sender’s Email Address is different from the Gmail address you logged in as, select the email address from the drop-down list. The logged-in email address is also used as the Reply-to Address, but you can change that.
Click Continue.
Send a Test Email
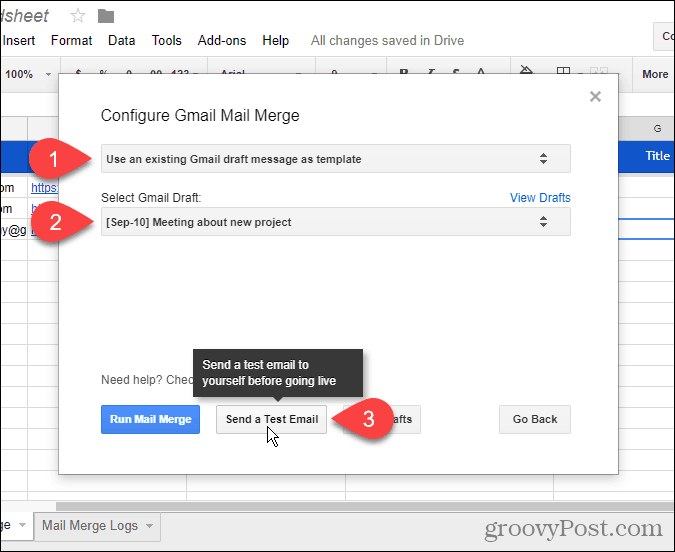
Select Use an existing Gmail draft message as template from the first drop-down list. Then, select the draft you want to use from the Select Gmail Draft drop-down list.
It’s a good idea to test your mail merge, so click Send a Test Email.
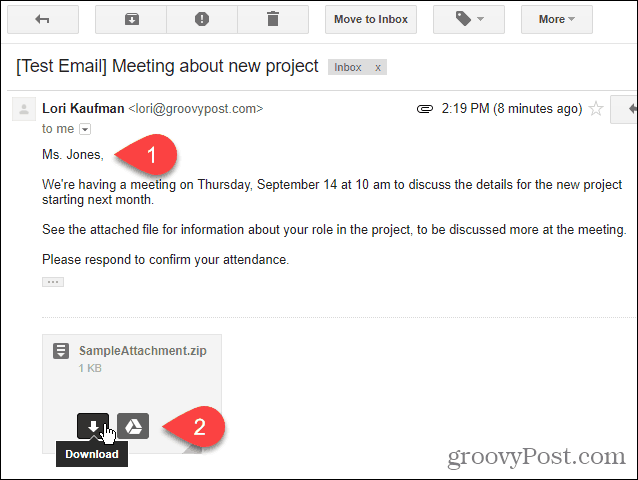
You’ll receive the test email in the account you signed in as on the mail merge spreadsheet. The variable field values from the first contact in your imported list are used. Any file attachment URLs you added are added to the bottom of the message. You can either download the file from the link or save the file to your Google Drive account.
Run Mail Merge
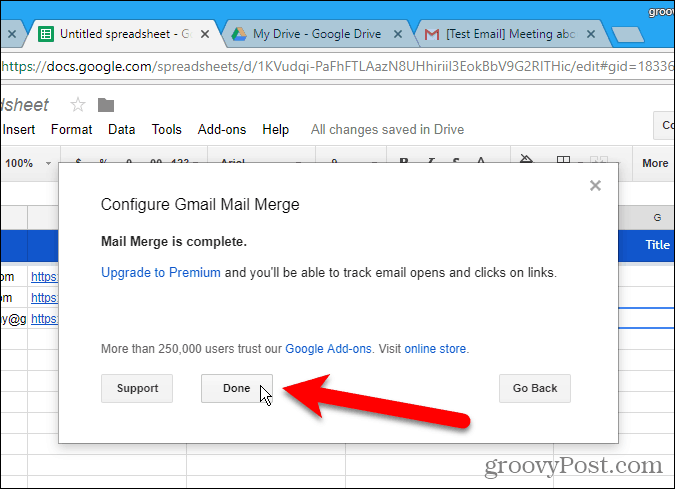
Go back to the mail merge spreadsheet and click Run Mail Merge to start sending the emails. If you added dates and times to the Scheduled Date column for any or all of the contacts, the emails will be sent then. Emails to contacts with no scheduled date and time will be sent immediately.

Once the mail merge is complete, click Done.
Rename the Mail Merge Spreadsheet
The mail merge spreadsheet is automatically saved as the default name Untitled spreadsheet. If you want to use this spreadsheet again, you might want to give it a better name.
To change the name of the mail merge spreadsheet, click on the name in the upper-left corner of the spreadsheet.
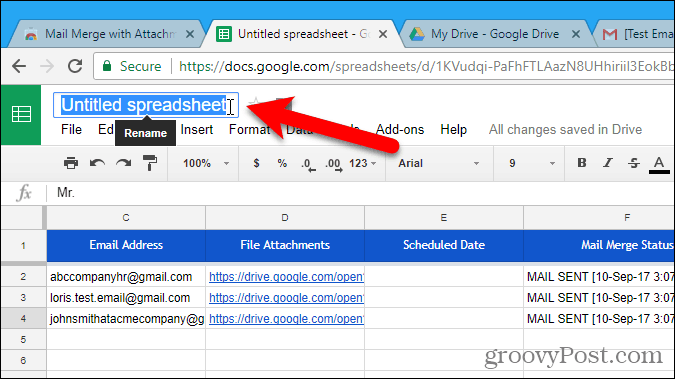
Type a new name. This new name displays on the spreadsheet.

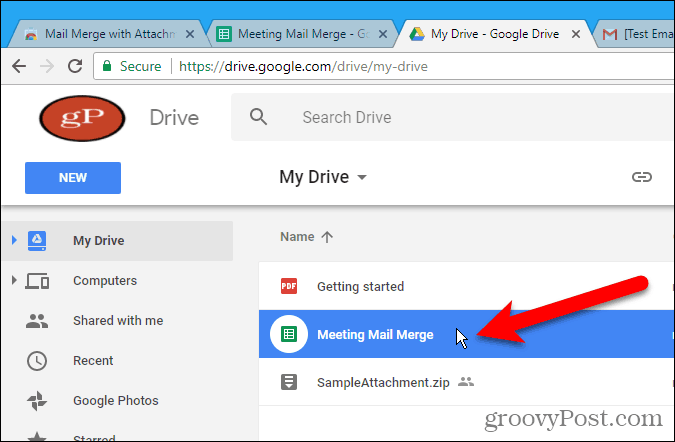
The new name you entered is also used as the file’s name in your Google Drive account. Now, you can use this mail merge again and change it as needed.
Mail merge is also a built-in feature in Word for Windows, Word for Mac, and Outlook 2013 or 2016 on Windows.
Do you use mail merge? Have you found any other ways to do mail merge in Gmail or ways to do mail merge in other email services? Let us know your experiences in the comments.


Juri
September 16, 2017 at 7:27 am
Thank you Lori, a very good one!