Can’t Delete ISO File Open in System: How to Fix
Are you having trouble trying to delete an ISO file? Here are some things to try when you can’t delete an ISO file open in system.
You have an ISO file that you no longer need, and it’s taking up space on your hard drive. You go to delete it when you see an error message: The action can’t be deleted because the file is open in System. No matter how many times you click ‘Try Again’ the file still won’t budge.
The good news is that are some fixes you can try to help you get rid of that ISO file once and for all. Here’s what to try if you can’t delete an ISO file open in System.
What is an ISO File?
An ISO file is a type of file that contains an exact copy of an optical disc, such as a DVD or CD. This type of disc image can be mounted on your computer, and it will appear as if there is an optical drive attached to your computer, with a CD or DVD containing data inserted into the drive.
ISO files can also be used to burn new copies of the DVDs or CDs that they were created from, or simply to contain a large number of files in one single file that is simple to download. ISO files are typically fairly large; once you’re finished with them, the likelihood is that you’ll want to delete them from your computer.
Why Can’t I Delete an ISO File Open in System?
If you try to delete an ISO file on Windows, you may receive a message that the file is open in System. This means that as the ISO file is in use, your computer is unable to delete it.
Solving this issue may be as simple as unmounting the virtual drive that your ISO file has created on your computer. If this doesn’t work, there are some other options you can try.
Unmount the ISO File
Opening an ISO file will create a virtual optical disc drive on your computer. This drive acts as if you have installed a CD or DVD into your computer with the contents of the ISO on the optical disc.
Whilst this virtual drive is mounted (made accessible to your computer) you will not be able to delete the ISO file that created it. That’s because the virtual drive is using the file to generate its contents. If you unmount this drive, in effect disconnecting the virtual drive, you should be able to delete the ISO file that created it.
There are several different ways you can go about dismounting a drive.
Unmount Using the Context Menu
You should be able to unmount the virtual drive created by your ISO file directly within File Explorer. You can do this using the Eject option in the context menu.
To unmount an ISO file using the context menu:
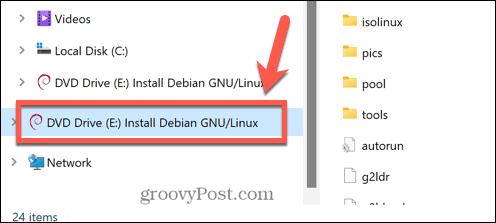
- Open File Explorer.
- In the left-hand column, look for the mounted drive.

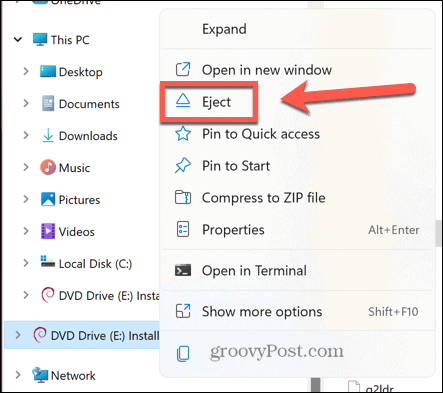
- Right-click on the drive and select Eject.

- Once the drive has been unmounted, try deleting your ISO file again.
Unmount in Command Prompt
You can also use the Command Prompt to unmount the virtual drive created by your ISO file or to unmount the ISO file itself
To unmount a disk image drive in Command Prompt:
- Click the Search icon in the Windows taskbar.

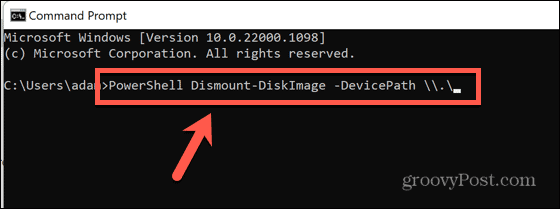
- Type cmd and double-click the Command Prompt app when it appears.

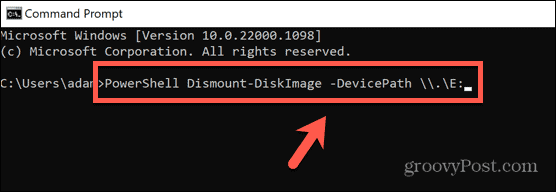
- Type PowerShell Dismount-DiskImage -DevicePath \\.\

- Type the letter of the drive you want to unmount, followed by a colon.

- Press Enter.
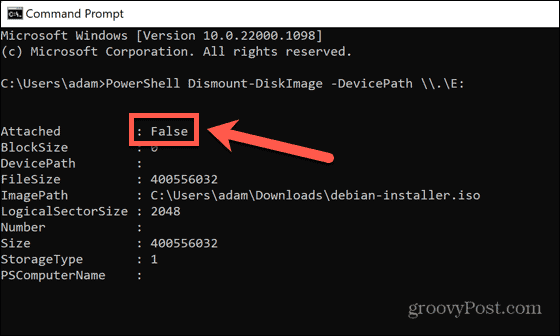
- Once completed, you will see a message starting with Attached:False.

- Close Command Prompt and try deleting the ISO file again.


If you cannot see the disk image drive in File Explorer, or you’re not sure which of the drives of your computer is the disk image created by the ISO file, you can try unmounting the ISO file itself.
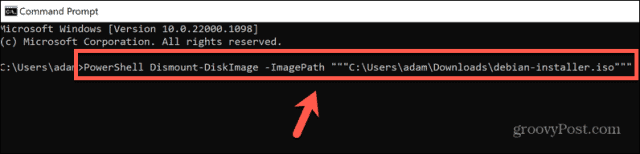
To unmount an ISO file in Command Prompt:
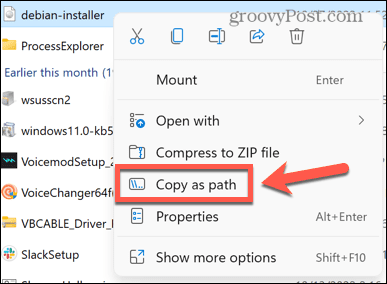
- Open File Explorer and navigate to the folder containing your ISO file.
- Right-click the file and select Copy As Path.

- Click the Search icon.
- Type cmd and double-click the Command Prompt app when it appears.
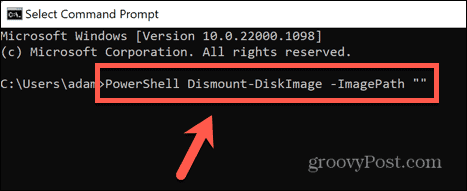
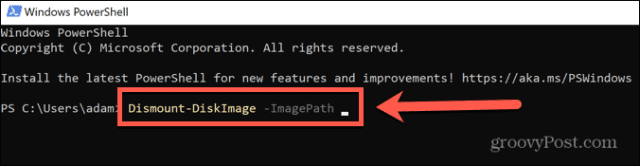
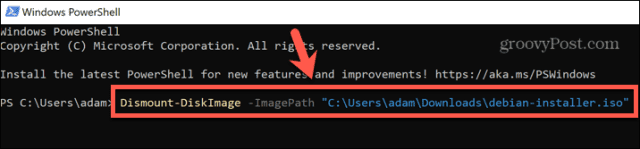
- Type PowerShell Dismount-DiskImage -ImagePath “”

- Press Ctrl+V to paste the full path of your ISO file, then type two more quotation marks.

- Press Enter.
- Wait for the file to unmount. You will see a message starting with Attached: False once the file has unmounted.

- Close Command Prompt and try deleting the ISO file again.

Unmount Using PowerShell
The above method uses a PowerShell command in Command Prompt to unmount the drive or ISO file. You can achieve the same result directly in the PowerShell app. Once again, you can choose to unmount the virtual drive, or the ISO file itself.
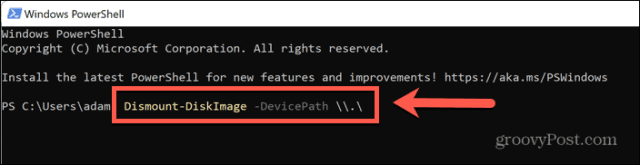
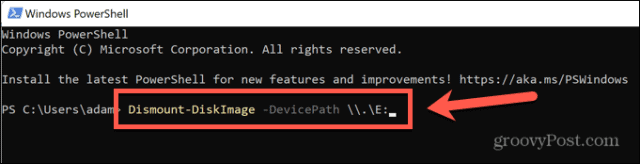
To unmount a disk image drive in PowerShell:
- Click the Search icon.
- Start typing PowerShell and double-click the PowerShell app when it appears.

- Type Dismount-DiskImage -DevicePath \\.\

- Type the letter of the virtual drive that you want to unmount, followed by a colon.

- Press Enter.
- When the process is complete, you’ll see a message that starts with Attached: False.

- Close PowerShell and try deleting the ISO file again.

If you’re not sure which drive on your computer is the virtual drive from the ISO, or you can’t see the virtual drive in File Explorer, you can try unmounting the ISO file itself.
To unmount an ISO file in PowerShell:
- Open File Explorer and navigate to the folder that contains your ISO file.
- Right-click the file and click Copy As Path.
- In the Windows taskbar, click the Search icon.
- Start typing PowerShell and double-click the PowerShell app when it appears.
- Type Dismount-DiskImage -ImagePath followed by a space.

- Press Ctrl+V to paste the full path of your ISO file.

- Press Enter.
- When the file has unmounted, you will see a message starting with Attached: False.

- Close PowerShell and try deleting the ISO file again.

If you cannot see the disk image drive in File Explorer, or you’re not sure which of the drives of your computer is the disk image created by the ISO file, you can try unmounting the ISO file itself.
Restart Your Computer
If unmounting your ISO file doesn’t work, you can try restarting your computer. This may stop whatever process is currently using your ISO file and allow you to delete the file.
To restart your Windows computer:
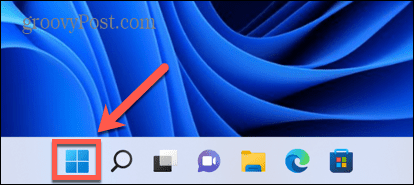
- Click the Start icon in the Windows taskbar.

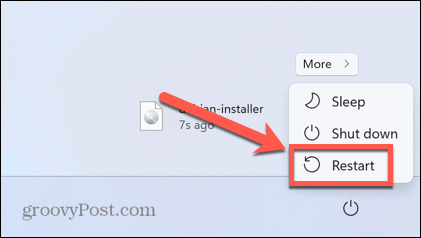
- At the bottom-right of the window, click the Power icon.

- Select Restart.

- When Windows has finished restarting, try deleting the file again.
Delete the ISO File in Safe Mode
If you cannot delete the ISO file after restarting, you can try restarting in Safe Mode. This opens Windows with a minimal set of drivers. Using Safe Mode may mean that the process that is stopping your ISO file from deleting will not run, allowing you to delete the file.
To restart Windows in Safe Mode:
- Click the Start icon at the bottom of the screen.
- In the bottom-right of the window, click the Power icon.
- Hold down the Shift key and click Restart.
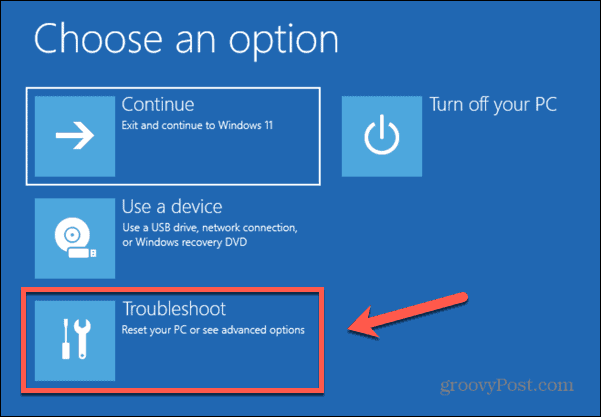
- Your computer will now boot into the recovery environment.
- Click Troubleshoot.

- Select Advanced Options.

- Choose Startup Settings.

- Click Restart.

- Press 4, 5, or 6 to boot into Safe Mode.

- Try deleting your ISO file again.
- Restart your computer as normal to exit Safe Mode.


Delete the ISO File Using IObit Unlocker
If none of the methods above have worked, you can try using a third-party app to unlock your file so that you’re able to download it. There are a number of options available. We’ll take a look at how to use IObit Unlocker, which is a free application.
To delete an ISO file using IObit Unlocker:
- Download and install IObit Unlocker.
- Once the installation finishes, open File Explorer.
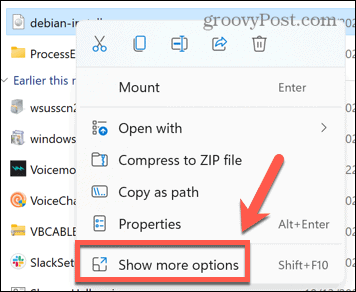
- Right-click on the ISO file you want to delete.
- Select More Options.

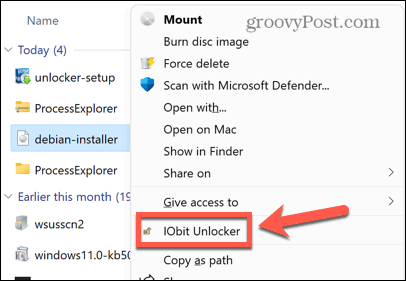
- In the context menu, click IObit Unlocker.

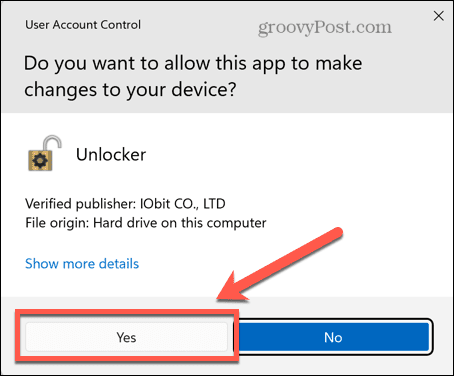
- Confirm that you allow IObit Unlocker to make changes to your computer.

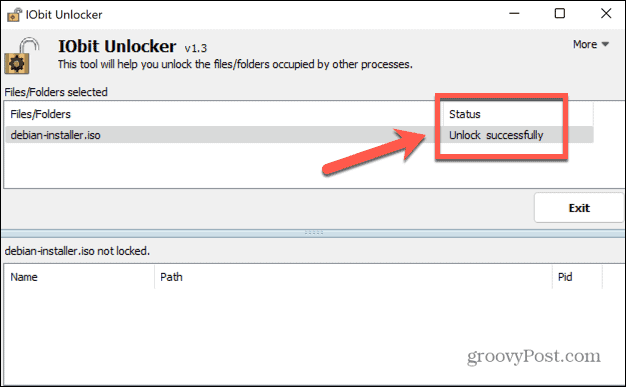
- In IObit Unlocker, ensure that your ISO file is selected and click Unlock.

- If successful, you’ll see a message that your file has been unlocked successfully.

- Close IObit Unlocker and try deleting the ISO file again.

Take Control of Windows
Hopefully one of the methods above has stopped you from receiving the error that you can’t delete an ISO file open in System. If you find another useful method of deleting ISO files that generate this error, please let us know in the comments below.
If you’re having trouble deleting other file types, then there are some methods you might try to delete undeletable files in Windows 11. There are also some tricks you can use to delete temporary files on Windows 11. ISO files aren’t the only type of file format that can be tricky to deal with, too.
You might also want to learn how to install a CAB file on Windows 11 if you’re trying to install an update you’ve manually downloaded.


