In previous Photoshop tutorials, I’ve demonstrated the use of the basic Photoshop tools and options. Today I’m going to demonstrate a more advanced technique of adding a tattoo effect to someones body. I encourage you to follow along as there’s no better way to learn something than actually doing it!
Being a more advanced photoshop tutorial, I decided to start things off with a video screencast followed by the typical groovyPost step-by-step tutorial with screenshots. Let’s get started!
Before you begin with Photoshop, you will need an image for the tattoo and a photo you want to add the tattoo on.
Now, carefully remove the background from the tattoo image. Feel free to use the Magic Eraser Tool, Magic Wand Tool, Rectangular Marquee, Polygonal Lasso. Any of them can do the job.


With the background removed, add the tattoo image and press and hold Ctrl and click on the layer thumbnail to select all layer contents.


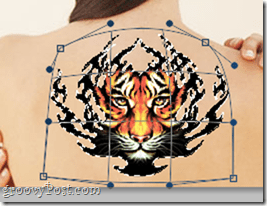
After selecting right-click the image and select Free Transform. Then, while holding Alt+Shift, drag any of the corner anchor points and drag in or out to adjust the image accordingly.


Now you can right-click again, and pick Warp to start slightly curving the image along the body curves, again using the anchor points to create an effect as if the tattoo is actually real.


Press Enter when done. The tattoo should look slightly curved along the edges of the body, but if it’s looking too curved, don’t hesitate to press Ctrl+Z and give everything a second try.


With the tattoo placed in the right spot, go to the Layers panel and pick the Multiply blending mode to ensure everything looks as real as possible.


There — much better.


Optional
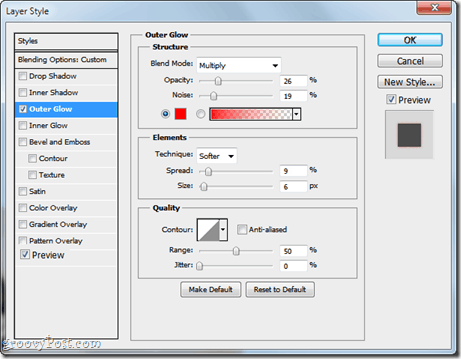
If you’ve seen someone with a new tattoo, usually the skin around it is slightly red. That’s what we’re aiming to do with this effect. We’ll go to the layers Blending Options and check Outer Glow.


Now, as an outer glow color we’ll pick the pure red (R:255 G:0 B:0) and set the outer glow settings as it follows:
Structure
- Blend Mode – Multiply
- Opacity – Somewhere from 15% to 30%
- Noise – Somewhere from 15% to 20%
Elements
- Technique – Softer
- Spread – 9%
- Size – 6%


The final result should look something like this.


With your new awesome Photoshop “tattooing” skills go give yourself and your friends tattoos – no buzzing needles or pain required!
Leave a Reply
Leave a Reply


