
When you throw away old paper checks and tax returns, you shred them (right?). This makes them unreadable to would-be identity thieves or people who are just too nosy for their own damn good. But what do you do with your old data when you want to trash it? If you’re not securely erasing your files and hard drives, then you’re doing the equivalent of putting your bank statement in the trash without shredding it. It’s not a guarantee of catastrophe, but it’s risky.
If you don’t sanitize a hard drive with a secure format, then chances are there are gigabytes worth of data that can be easily undeleted by any kid with a free data recovery utility off the Internet. To illustrate this, let’s take a look at a Windows Quick Format vs. Full Format vs. Secure Format/Erase.
Tutorial Outline
- How to Perform a Quick Format / Is a Quick Format Secure?
- How to Perform a Full Format / Is a Full Format Secure?
- Eraser: Secure Erase and Erase Unused Space
- DBAN: Erase a Hard Drive without Removing It
How to Perform a Quick Format
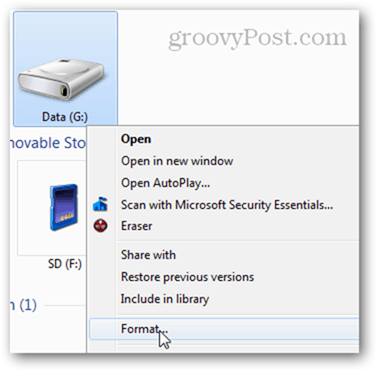
A Quick Format is a fast way to prep an old drive for a new life. You can do it from Windows Explorer by clicking Start > Computer and then right-clicking the drive and choosing Format…
In the Format disk window, check Quick Format and click Start. That’s all there is to it.

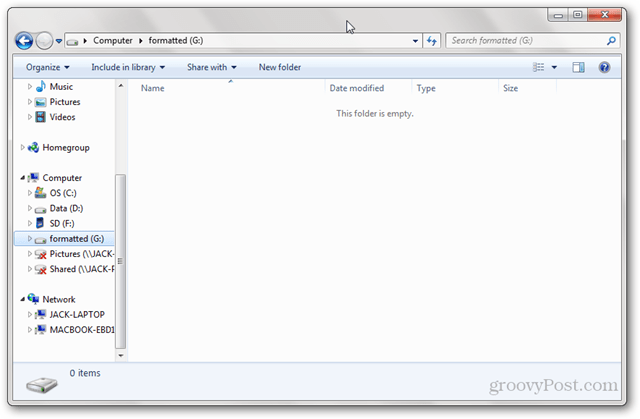
The drive will appear to be blank in Windows Explorer.
Is Quick Format Secure?
What makes a Quick Format quick is that it doesn’t delete all data on the disk. Instead, a Quick Format writes a new file table onto the drive. The new file table doesn’t have any information about the data that was on the disk before the format. So, for most purposes, the disk is now “blank.” This is good if you are going to be reusing the disk yourself or if you are reinstalling an operating system. But if you are selling, donating or trashing your hard drive, a Quick Format isn’t a good idea.
Above, we saw that a quick formatted drive ended up blank in Windows Explorer. But what if we analyze the drive using a data recovery utility?
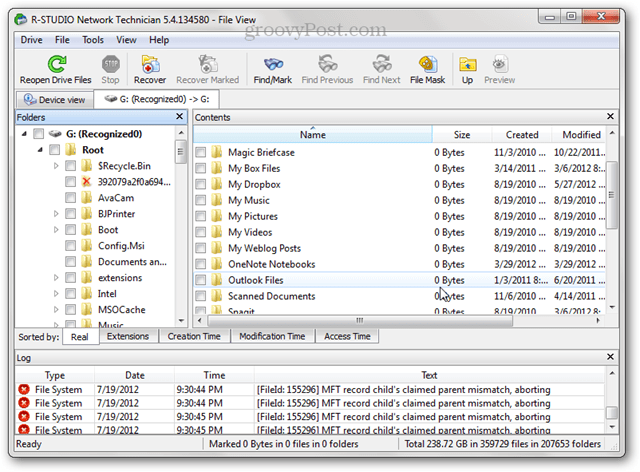
What we see above is virtually all files and folders that were on that hard drive before it was quick formatted. That’s because we’ve overwritten the file table, but we haven’t overwritten the data with anything. Until new data is written onto the disk, the old data will still be accessible via programs like R-Studio, Recuva, or TestDisk. This is the reason why a full format is recommended when prepping a hard drive for a truly fresh start.
How to Perform a Full Format
To perform a full format, right-click the drive in Windows Explorer and click Format… as you did before, but this time, un check Quick Format. Click Start.
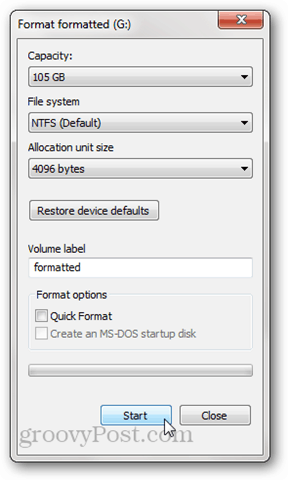
Like a Quick Format, a full format overwrites the file table with a new one. But it also writes zeros onto the entire disk or partition. For this reason, it’ll take much longer than a Quick Format. Let’s try analyzing it again in R-Studio:

None of the old files that were on the disk before the format show up. There is some meta data on the disk, but this was recently written during the format (as you can see by the “created” date).
Note: In Windows XP, a full format does not overwrite the disk with zeros. Instead, it overwrites the file table and checks the disk for bad sectors. To do a full format as described above, you’ll need Windows Vista or later.
Is a Full Format Secure Enough?
While writing this article, I tried my darndest to recover data off of my full formatted drive. I tried performing deep scans using both R-Studio and Recuva and found no recoverable files. Given that, I would say that doing a full format in Windows Vista or later is secure enough for most personal users. If you have government secrets or sensitive customer data on your hard drive, you’ll want to do a more thorough job of obfuscating your data. Allegedly, there are ways to recover parts of data that has been overwritten, but it requires a true data recovery pro and some expensive equipment.
You should also be aware that, due to the way the firmware on drives work, there are some sectors that can’t be deleted through normal means. For example, when a sector is corrupted, the drive marks it as bad and stops allowing access to it—even to wipe it. In addition to bad sectors and reserved sectors (which are used when sectors go bad), most hard drives have recovery partitions on them or separate data partitions on them. These won’t always show up in Windows Explorer, so they may not get wiped by a full format.
Also, studies show that solid-state drives are nearly impossible to securely wipe, due to the way the data is physically handled. The best way to securely destroy data is by shredding the whole drive.
Eraser: Secure Erase and Erase Unused Space
If you want something a little bit more secure than a full format but not as extreme (or costly) as hiring someone to run your hard drive through an industrial-grade shredder, then you might want to check out Eraser. Eraser is a free utility that formats your drive and then overwrites the blank space several times with “special patterns.” The makers of Eraser claim that they’ve taken into consideration all the sticky issues that hinder hard drive sanitization, including “the use of write cache, construction of the hard disk and the use of data encoding” and designed their program to solve them. I’m in no position to debunk or verify those claims, but the program is free and immensely popular, so it’s worth a try.
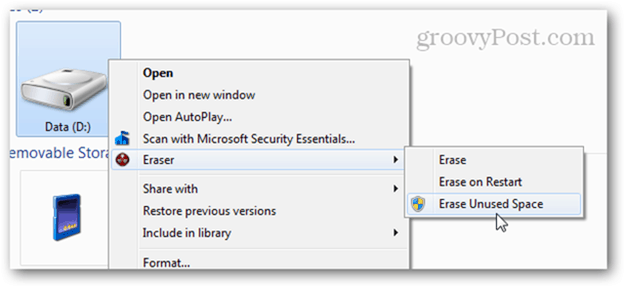
After installing Eraser, you get a new option in your right-click contextual menu in Windows Explorer with three different options: Erase, Erase on Restart, and Erase Unused Space.
After choosing one, the process goes to town in the background. When it’s done, you’ll get a notification in your taskbar. You can also check the status by opening Eraser from your system tray.
Erase Unused Space is handy if you’ve already started using a disk that you should’ve full formatted. Using this option, you can securely wipe what’s left on the disk without impacting the files you’ve written on it since the format. Reinstalling Windows onto your computer and then running Erase Unused Space on the drive would do a fairly good job of securely erasing its contents.
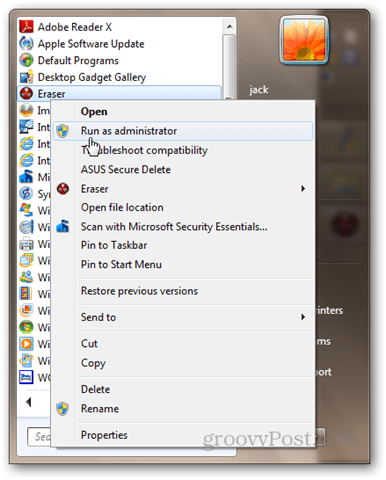
Note that, even though clicking Erase Unused Space launches the User Access Control window, it may sometimes fail even after clicking Yes. If you look at the task log, you’ll see a log output saying: “The program does not have the required permissions to erase the unused space on disk. Run the program as an administrator and retry the operation.”
This happens because when you run another Eraser operation that doesn’t require administrator access, it’ll launch it normally. So, when you go to launch it again, it’s already running.

If this happens, try right-clicking the Eraser icon in your system tray, choosing Exit Eraser and then re-launching it from the Start menu by right-clicking it and choosing Run as Administrator.
Now, try erasing the unused space again. It should work.
DBAN: Erase a System Disk without Removing It
Performing a full format is all well and good, but a disk can’t format itself. This makes formatting the drive that Windows is currently running on impossible. The other option: reinstalling Windows and then using Eraser to Erase Unused Space. This would work but it’s time consuming and you’ll be giving away your Windows license in the process.
If you don’t feel like cracking open your laptop to dig out the hard drive and attach it to another computer, then you should give Darik’s Boot and Nuke (DBAN) a try. DBAN can run without an operating system from a LiveCD or LiveUSB. This is also handy if your system drive is corrupted, or your computer won’t boot normally for some other reason.
Here’s how to use DBAN:
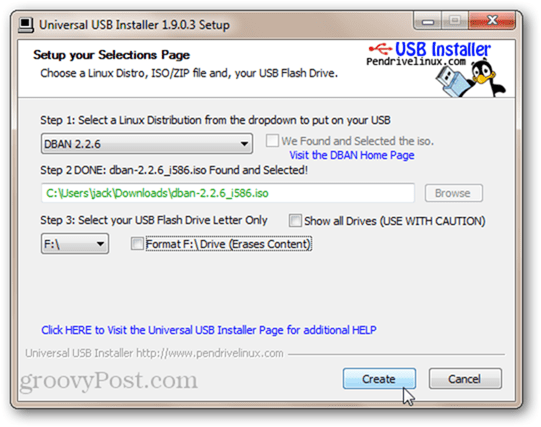
Download the ISO and use Windows Disc Image Burner to burn it to a disc or image. Or, create a bootable USB using Universal USB Installer (you can see a walkthrough of this process in this bootable USB tutorial; just choose DBAN as your Linux distro from the drop-down menu and skip the part about creating persistent storage).
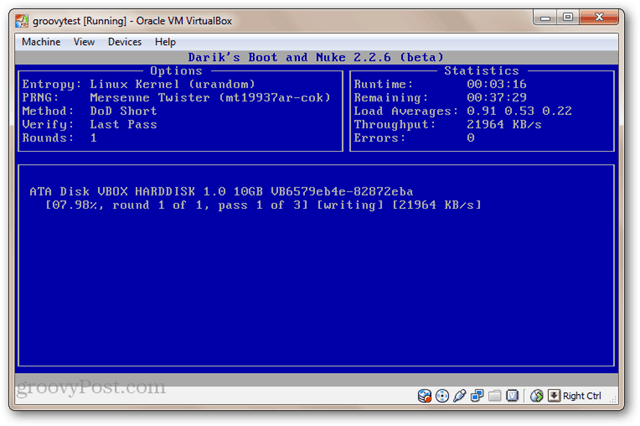
Boot your computer from the bootable USB drive or LiveCD. You may need to tweak your BIOS to change the boot order. You’ll see the austere DBAN screen.
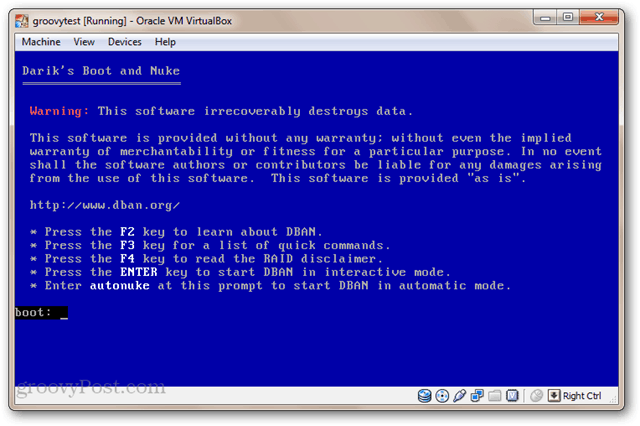
If you have only one drive installed and want to blast it without the fuss, type: autonuke and press Enter. DBAN will wipe the drive and overwrite it with random data. By default, it wipes the drive and writes over it three times (DoD short), but it also supports several other secure wipe methods. Settle in. This could take awhile.
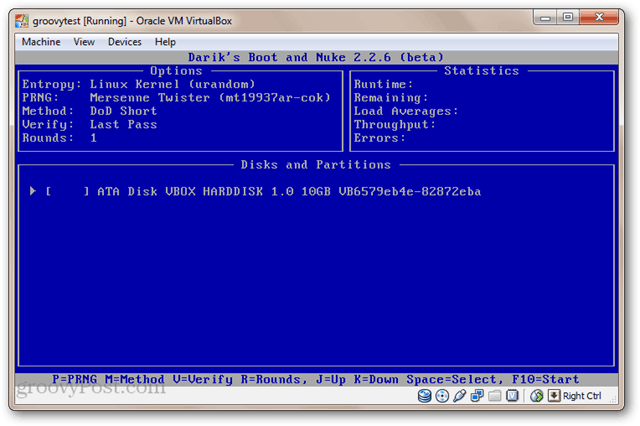
To use the interactive mode, press Enter from the main menu without typing anything. This lets you pick and choose the drives you want to delete.
Now your drives will be sufficiently nuked. To use them, they’ll have to be formatted.
Conclusion
There you go. Four different ways to erase your hard drive, including okay (Quick Format), good enough (full format), better (Eraser) and best (DBAN). While it’s unlikely that the next owner of your computer is going to go snooping through your old files, it certainly has happened. That’s why it’s never a bad idea to wipe your hard disk drive before sending it in for warranty repairs, trashing it or selling it. Combine that with an encrypted system disk and your data will be positively inscrutable.


ShockerSH
July 30, 2012 at 11:10 pm
What about the option to just use a sharp Drill and put a few nice holes in the platter?
ShockerSH
July 30, 2012 at 11:10 pm
Oh BTW – Awesome article Jack.
Jack Busch
July 31, 2012 at 3:08 am
That depends on how paranoid you are. In theory, someone would still be able to recover the data from the parts without holes. It would take expensive equipment but there is a chance that some enterprising off shore data pirate could buy your “broken” hard drive up in a lot and go fishing. Remember: a Word doc or PDF is only a few hundred kilobytes. That’s all they would need to find to get lucky.
winston
July 31, 2012 at 12:24 pm
thanks Mr Jack, you sure saves me a lot of headache, BTW you must have read mind, I was up late last night looking for ways to do the full format
thanks a bunch, you and Steve, and the rest of the guys
Steve Krause
August 1, 2012 at 7:02 pm
You bet! Thanks for the comment. I’m glad it was helpful For ya.
So many people take security and privacy for granted. Were doing our small part getting the works out.
Sent from my Mobile
Steve Krause
August 1, 2012 at 9:51 am
And expensive data recovery of today is a home kit tomorrow…. Better to do like Jack mentioned and just wipe the data and even better – encrypt it before hand.
Steve Krause
August 1, 2012 at 7:03 pm
Sounds dangerous. Most ppl I’ll bet don’t have a drill to do that I’ll bet also. :)
Sent from my Mobile
Brian Burgess
August 2, 2012 at 7:25 pm
I love DBAN, been using it for years. I even use it when I do a fresh install of Windows.
Winston
October 20, 2012 at 10:53 am
hey Guys, thanks again for the tip…. on doing a full format, on wiping my hard drives, and also the heads up on the Amazon Windows 8 deal:)
however I have a question, would I be wiping my Windows Vista 32 bit in the process of performing the (full format)?…
Rich O
December 29, 2012 at 8:35 am
Good article but I want to point out something about the following line in your article:
“Eraser: Secure Erase and Erase Unused Space”
Eraser does not employ ‘Secure Erase’. That is, Eraser is not calling the actual Secure Erase ATA command. Eraser is another tool, like DBAN, that relies on BIOS and the CPU to wipe a hard drive, contrary to ‘Secure Erase’ which is an ATA command internal to the drive itself. That is, Secure Erase is built-in ATA command set drive erase function which is independent of CPU and BIOS.
Why use a Secure Erase utility? Because it is a good deal quicker than DBAN, and it is higher-rated than DBAN according to the NSA and NIST.
Why not use Secure Erase? Because many motherboards make it difficult to use by blocking the command by default, though you can easily get around this by unplugging and replugging (hot-plugging) the hard drive power once the POST phase of BIOS is complete. (Talking SATA drives here only, not IDE/PATA. Do not try hot-plugging an IDE/PATA drive or you will most definitely fry something.)
In the past, people had been referred to CMRR’s original Secure Erase utility, but it is no longer supported. Today if you’re going to use a Secure Erase utility, try burning a copy of Parted Magic and use the version found on that. Hiren’s Boot CD is another good source.
mccarthy jennifer
January 23, 2014 at 4:13 am
I have always felt that recovering deleted files is a last-ditch measure. They might be corrupted for all you know, for example, which in some ways is worse than losing the file entirely. You really should backup your work, you really should. Recover Data For Windows allows you to find and recover recoverable deleted files from NTFS and FAT-formatted volumes, regardless of their type – you can recover pictures, songs, movies or documents. Recover Data for Windows will scan your hard drive and build an index of existing and deleted files and directories (folders) on any logical drive of your computer with supported file format. For a Full Tutorial you can visit : https://community.spiceworks.com/how_to/show/65428-how-to-retrive-deleted-files-from-windows-8-using-a-best-windows-data-recovery-application